
Last updated October 31, 2026
 Water damage drying
 Fire & smoke cleanup
 Mold remediation
 Storm response
 Sewage cleanup
 Reconstruction
Free visual inspection and a written scope of work before any mitigation begins - photos, moisture readings, and drying logs go in your claim file
The scope we write is the scope we bill. Anything new gets shown to you, in writing, before we touch it.
Get your free estimateWater Damage Restoration Maintenance Checklist for Corona Homeowners
Here’s what most Corona homeowners don’t hear after Water Damage Restoration services wrap up: the final inspection is not the finish line. It’s the starting gun for a 12-month period where the repaired materials in your walls, floors, and cabinetry are still settling, still equalizing, and still vulnerable to failure if residual moisture goes unnoticed. In Corona’s dry climate, homeowners often assume low humidity means moisture problems handle themselves. That assumption is exactly what lets a small amount of trapped moisture turn a $4,000 restoration into a $22,000 rebuild. This guide gives you the room-by-room protocol that catches those failures before they spread.
Restoration work we handle
Quick Answer
A water damage restoration maintenance checklist for Corona homeowners should include moisture readings at 30, 60, and 90 days after project completion, visual inspections of restored drywall and subfloor for swelling or staining, HVAC filter and duct checks if water reached ductwork, and documentation of all findings in case a warranty claim or insurance follow-up becomes necessary. For more guides & resources on protecting your home, explore our blog. Most restored materials fail within the first year because homeowners never check what’s happening behind the paint. A systematic checklist run on a schedule catches those failures while they’re still cheap to fix.
Table of Contents
- Why Restoration Work Fails After Inspection
- The 30-60-90 Day Moisture Verification Schedule
- Room-by-Room Inspection Protocol
- Corona’s Climate and Restored Materials: What the Dry Air Hides
- HVAC Maintenance After Water Intrusion
- Warranty Inspections and Documentation: What to Have Ready
- Common Mistakes to Avoid
- When to Call a Professional
- Frequently Asked Questions
- The Bottom Line
Why Restoration Work Fails After Inspection
Restoration work that passes final inspection can still fail within 12 months. We see it in Corona homes year after year, and the pattern is consistent. The drying process verifies that materials have reached a target moisture content at the moment of inspection. What it doesn’t account for is what happens when those materials continue to move, settle, and respond to the building’s internal environment over the following seasons.
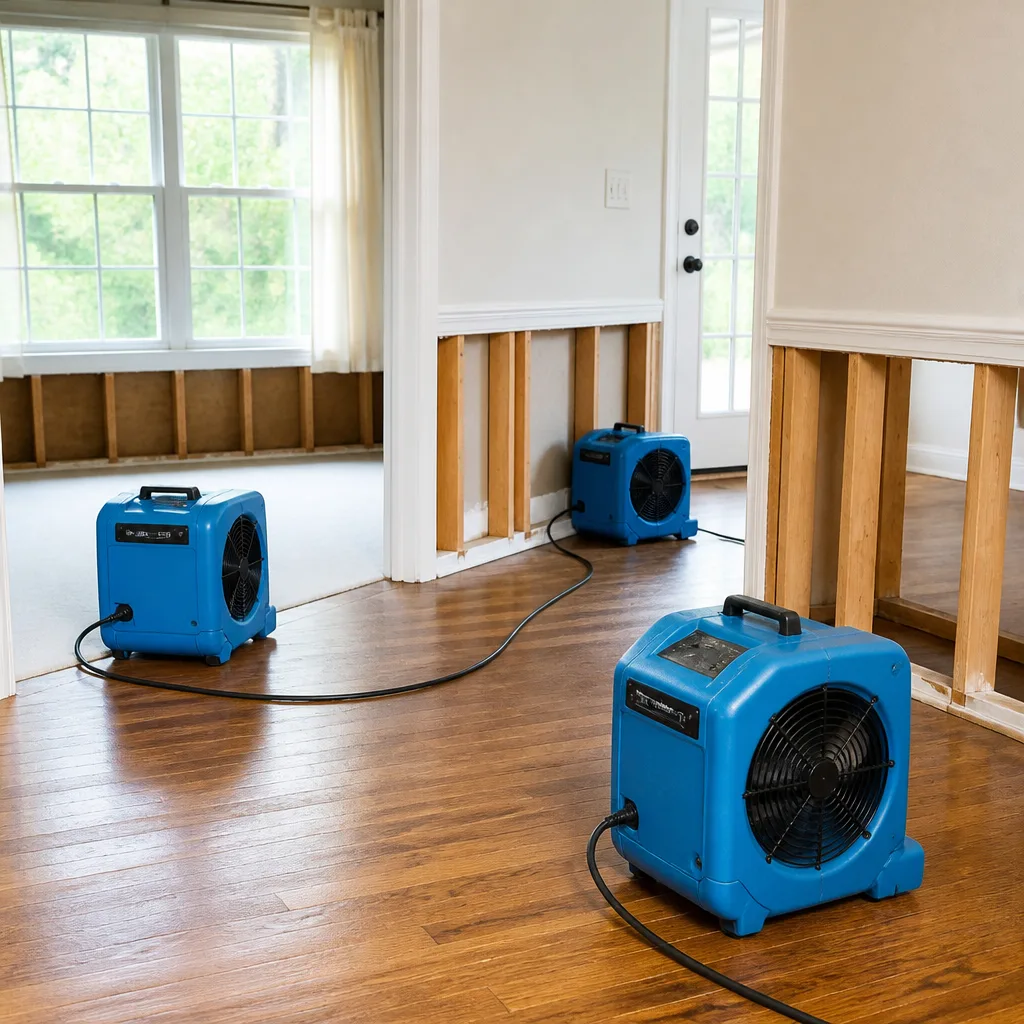
Think about what restoration actually does. Water saturates drywall, subfloor, framing, or cabinetry. The restoration crew extracts standing water, runs commercial drying equipment, and monitors readings until the numbers hit an acceptable range. Then they rebuild. New drywall goes up. Paint goes on. Trim gets reinstalled. Flooring goes down. The moisture meter says the structure is dry enough, and everyone signs off.
But here’s the issue: building materials are porous. They hold moisture in layers that meters only read at the surface or at probe depth. If a pocket of residual moisture sits deeper in a wall cavity or under a subfloor, it won’t show up on a standard surface reading. Over the next several months, that moisture migrates. It follows the path of least resistance: toward the drier air inside your Corona home, especially during summer when indoor humidity drops with air conditioning running around the clock.
When that hidden moisture reaches the surface, it meets the back of your new paint, the underside of your new flooring, or the interior of your newly rebuilt cabinetry. That’s when failures appear: bubbling paint, warping baseboards, staining, or worse, mold growth on surfaces that were supposedly restored.
The reason most restoration companies don’t tell you this is simple. Once the final check clears and the invoice is paid, the project is closed on their end. The burden shifts to you. That’s not malice; it’s just how the industry works. But it means the homeowner who knows what to look for in the year after restoration is the homeowner who catches a $600 problem before it becomes a $6,000 one.
At OC Restoration Co home, our IICRC-certified teams document moisture readings at every stage because we know that what happens after the final walkthrough matters just as much as what happens during the job. But even with the best documentation, the year after a water event requires homeowner vigilance. This checklist is that vigilance, organized into a schedule you can actually follow.
The 30-60-90 Day Moisture Verification Schedule
The most important maintenance step after any water damage restoration in Corona is running a moisture verification schedule at three specific intervals: 30 days, 60 days, and 90 days after project completion. See our Water Damage Restoration Troubleshooting: Common Problems and How to Fix Them for deeper guidance on what to watch for. This isn’t a suggestion. It’s a protocol we recommend to every homeowner we work with because those three checkpoints correspond to the phases where residual moisture either equalizes or causes visible failure.
Here’s why the timeline matters:
Day 30: By the one-month mark, your home has gone through at least one full cycle of Corona’s day-to-night temperature swing. Summer nights in Corona can drop 30 degrees from daytime highs, and that swing causes building materials to expand and contract. If residual moisture is present, the contraction at night pulls it toward surfaces. Day 30 is when you’ll see early signs: a slight seam in the drywall that wasn’t there before, or paint that feels cool to the touch in a specific spot.
Day 60: Two months in, any hidden moisture has had time to migrate through wall cavities and subfloor channels. This is the point where homeowners discover whether the original drying was genuinely complete or merely surface-level. Pay special attention to the baseboards and the bottom six inches of drywall in restored rooms. Moisture wicks downward and pools at the lowest point.
Day 90: The three-month mark is the equalization threshold. If materials were properly dried and rebuilt, they’ve now stabilized to Corona’s ambient conditions. If readings are still elevated or visual signs are present at day 90, something was missed during the original restoration and you need to document it immediately for a warranty discussion.
For homeowners who want to run their own readings, a basic pin-type moisture meter costs between $30 and $80 and is available at most hardware stores. The protocol is simple:
- Choose a baseline point in an unaffected room. Take a reading on a dry wall in that room and note the number.
- Take readings on restored surfaces at three heights: baseboard level, mid-wall, and ceiling line.
- Compare readings. Restored surfaces should read within 2 to 4 percentage points of your baseline.
- Log every reading with the date and location. You’ll want this record if a warranty claim becomes necessary.
- If any reading exceeds baseline by 5 percentage points or more, call your restoration contractor for a follow-up inspection.
In our experience with Corona homes, most homeowners skip this entirely. They assume that because the restoration crew said the job was done, the job was done. But a moisture meter doesn’t lie. Run the schedule, log the numbers, and you’ll either confirm the work was solid or catch a problem early enough to address it without a full remediation.
Room-by-Room Inspection Protocol
Different rooms fail in different ways after water damage restoration. The materials that need watching in a kitchen are not the same as the materials that need watching in a bathroom or a garage. Here’s a room-by-room breakdown of what to inspect and when.
Kitchens and Bathrooms
Cabinetry is the first thing to watch. Composite wood cabinets absorb water at their base and expand. Even after drying, if residual moisture remained inside the cabinet base, the doors will start to stick, the toe kick will bow outward, or the finish will cloud near the floor. Run your hand along the bottom edge of every cabinet door. If it feels rough, bubbled, or slightly tacky, moisture is present.
Under-sink areas need particular attention in Corona because the hard water here leaves mineral deposits that can mask slow leaks. If you see white crusty buildup around the pipes after restoration, that’s not the restoration failing; that’s a pre-existing plumbing issue the water event exposed. Document it, fix it, and keep the area dry.
Living Areas and Bedrooms
Restored drywall should feel uniform across the wall surface. Run your palm across the area where old drywall meets new drywall at the cut line. If you feel a ridge, a depression, or a difference in texture, the new material is moving differently than the old. That movement is almost always moisture-related or caused by improper installation.
Look at the baseboards. In Corona, baseboards installed after a water event can separate from the wall if the subfloor still holds moisture. The subfloor swells, the baseboard gets pushed up, and you’ll see a gap or a crack in the caulk line. That’s a specific failure mode we see in homes where the original drying focused on the walls but didn’t adequately address the subfloor.
Garages and Laundry Rooms
Concrete slabs in Corona garages and laundry rooms are slow to dry after water intrusion. If the restoration involved a slab leak or a washing machine overflow, the concrete may have been dried to an acceptable surface reading but retains moisture deeper down. Over months, that moisture works upward and causes efflorescence, the white powdery substance you’ll see on the slab surface. Efflorescence after restoration means the slab wasn’t fully dried and you should have it re-evaluated.
Windows and Exterior Walls
Corona’s summer sun hits stucco exterior walls hard. If water entered through windows or exterior wall penetrations and the restoration addressed the interior only, the exterior envelope may still be compromised. Watch for paint blistering on exterior walls, which indicates trapped moisture pushing outward. Inside, check window sills for softness and frame corners for staining. These are signs that moisture is migrating through the wall assembly and the original repair didn’t address the full path.
Corona’s Climate and Restored Materials: What the Dry Air Hides
Corona’s climate is often described as Mediterranean: hot dry summers, mild wet winters, and low year-round humidity compared to coastal California cities. Homeowners tend to see that as a maintenance advantage. For restored materials, it’s actually a complicating factor that hides problems until they become serious.
In humid climates, residual moisture announces itself quickly through visible condensation, musty odors, and rapid mold growth. The air is so saturated that moisture has nowhere to hide. In Corona, the opposite happens. The dry air pulls moisture out of materials so gradually that the early warning signs never appear. A pocket of moisture inside a wall cavity can sit there for months, slowly being drawn toward the surface by the dry Corona air, without ever producing an odor or a visible stain.
Then the weather changes. Winter brings rain and cooler temperatures. Materials that had been slowly drying inward now face moisture pressure from outside. The equilibrium shifts. That’s when failures appear that seem to come out of nowhere. A homeowner will say, “The restoration was six months ago and everything was fine, and then suddenly the drywall started bubbling.” The drywall didn’t suddenly fail. It had been holding moisture for months, and the seasonal change tipped it over the edge.
Corona homeowners should also understand how temperature swings stress restored materials differently than the original drying phase. During restoration, drying equipment creates a controlled environment: stable temperature, directed airflow, monitored humidity. After the equipment leaves, the materials face Corona’s natural conditions. Summer daytime highs in the 90s followed by nighttime lows in the 60s cause expansion and contraction cycles that test every seam, joint, and adhesive surface in the restored area.
The takeaway: don’t interpret the absence of visible signs as proof that everything is fine. In Corona’s climate, the absence of signs often means the moisture is still moving, just slowly. That’s exactly why the 30-60-90 day verification schedule matters. Without scheduled checks, you won’t catch the problem until it’s advanced enough to announce itself.
HVAC Maintenance After Water Intrusion
If water intrusion reached your ductwork, air handler, or any part of the HVAC system, the mechanical equipment needs specific attention in the months following restoration. This is a step most Corona homeowners overlook because HVAC work isn’t visible. But ducts that got wet can harbor problems long after the visible areas have been restored.
Here’s the sequence we recommend for homes where water reached HVAC components:
- Day 1 to 7 after restoration: Run the system for 15 minutes and check for musty or earthy odors from the vents. Any smell indicates microbial activity in the ducts or on the air handler coil.
- Day 30: Replace the air filter with the highest MERV rating your system can handle, typically MERV 11 to MERV 13 for homes with documented water intrusion. The old filter has been capturing whatever was airborne during drying.
- Day 60: Inspect the condensate drain line and drain pan. Water intrusion can leave sediment that clogs the drain line just enough to cause slow drainage, which creates standing water, which creates mold downstream.
- Day 90: Have a licensed HVAC technician inspect the coil and blower for corrosion or microbial growth. This is a professional inspection, not a DIY check.
- Ongoing: For the first year, replace filters every 60 days instead of the standard 90. The extra filtration pass helps capture any particulates released as materials continue to equalize.
Corona’s air quality adds another layer. The Santa Ana winds carry fine dust that accumulates on HVAC components. After a water event, that dust becomes a growth medium for anything microbial that’s present. Keeping filters fresh and checking the drain line isn’t just maintenance; it’s a protective measure for your restored home environment.
If the water intrusion involved black water (sewage or flooding), the ductwork should have been professionally cleaned or replaced during the original restoration. If it wasn’t, that’s a discussion you need to have with your restoration contractor immediately. Sewage-contaminated ducts cannot be adequately addressed with a filter change.
Warranty Inspections and Documentation: What to Have Ready
Most restoration warranties in California cover workmanship and materials for a defined period, often one year. But a warranty is only as good as the documentation behind it. Homeowners who can’t show a clear record of the original issue, the restoration work performed, and the post-restoration maintenance they completed will face an uphill battle if they need to invoke a warranty.
Here’s what to keep in a file, either paper or digital, for at least two years after restoration:
- The original moisture readings from before drying began, if the restoration company provided them.
- Daily drying logs if the project ran multiple days.
- The final moisture readings at project completion.
- Photos of every stage: before, during, and after.
- Your 30-60-90 day reading logs from the verification schedule.
- Any correspondence with the restoration company, including emails about concerns.
- Receipts for any follow-up repairs or professional inspections you arranged.
A warranty inspection is warranted when your 30-60-90 logs show readings that remain elevated at the day 90 checkpoint, when visible signs appear (bubbling, warping, staining, odor), or when you have a specific concern you can document. Before calling, review your file and be ready to share the specific readings and dates that prompted the concern.
One note from our work with Corona homeowners: insurance adjusters appreciate documentation more than any other factor. If your water damage claim involved insurance, the same file that supports a warranty discussion also supports any follow-up with your carrier. Photo-documented findings with dates and readings are the strongest evidence you can bring to either conversation.
If the original restoration was completed by a company that used equipment like Dri-Eaz or Phoenix drying systems with proper documentation, you’ll have a significant advantage. Those systems produce measurable, logged data, and that data matters when questions arise months later.
Common Mistakes to Avoid
- Assuming dry air means dry walls. Corona’s low humidity doesn’t automatically resolve hidden moisture. It often just slows the migration process, which means problems appear later rather than sooner. Run scheduled checks regardless of how dry the climate feels.
- Painting over suspicious areas. If you notice a small bubble, a discoloration, or a texture change, don’t cover it with paint. Paint seals the surface and traps the moisture inside, converting a minor fix into a major issue. Document the spot and investigate first.
- Skipping the documentation step. Homeowners who run moisture checks but don’t record the numbers have no evidence if something fails later. Log every reading with date, location, and the specific reading value. A log is your warranty leverage.
- Ignoring HVAC symptoms. A faint musty smell from vents is easy to dismiss, especially in Corona where outdoor air occasionally carries agricultural or wildfire odors. But a persistent vent-specific odor after water intrusion is a real signal. Investigate it before it spreads through the system.
- Waiting for visible signs before acting. By the time drywall bubbles or flooring warps, the moisture problem has been active for weeks or months. The 30-60-90 schedule exists specifically to catch problems before they become visible. Use it.
- Assuming the restoration company will follow up. Most won’t. The project closes, the invoice settles, and the next job begins. That’s not a failure of the company; it’s the reality of the industry. The follow-up responsibility is yours, and a proactive homeowner catches what a busy company can’t.
When to Call a Professional
Some things a homeowner can handle: running a moisture meter, checking filters, logging readings, and documenting observations are all within reach. But certain situations require a professional restoration team. If your day 90 readings are still elevated compared to baseline, if you see mold growth on any restored surface, if you smell persistent musty odors that don’t resolve with cleaning and ventilation, or if you’re in a warranty dispute that requires expert documentation, call a certified professional.
Corona homeowners should also call a professional if a new water event occurs in an area that was previously restored. Prior restoration creates pathways for water movement that didn’t exist in the original structure, and those pathways can direct water into places that are hard to see and harder to dry. Water Damage Restoration in Fallbrook is one of the service areas where our teams regularly encounter second-event damage in previously restored homes, and the pattern is consistent: the second event is always worse when the first restoration wasn’t fully verified.
OC Restoration Co offers free estimates in Corona and the surrounding areas. Call (833) 589-7005 and we’ll walk you through what you’re seeing, what it means, and whether professional intervention is warranted.
Frequently Asked Questions
In Corona’s dry climate, hidden moisture can take 3 to 9 months to produce visible signs after restoration. The timeline depends on where the moisture is trapped, the building materials involved, and seasonal temperature changes. This is why the 30-60-90 day verification schedule is essential: it catches moisture before it becomes visible damage. If you’re past the 90-day mark and seeing signs now, call (833) 589-7005 for a professional assessment.
Yes, a basic pin-type moisture meter works fine for homeowner-level verification. The key is to establish a baseline reading in an unaffected room and compare restored surfaces against that number. Readings within 2 to 4 percentage points of baseline are normal. Anything beyond 5 points warrants a professional follow-up. No special training is required for comparative readings.
Look for three specific signs in Corona homes: a visible seam or ridge where new drywall meets old, paint that feels cool to the touch in one specific area, and baseboard separation from the wall. Any of these indicates movement in the wall assembly, which is almost always moisture-related in the first year after restoration. Document what you see, take photos, and contact your restoration contractor.
Not necessarily. If the water was clean (supply line, rainwater clean category) and the ducts were professionally dried and cleaned during restoration, replacement is usually not required. If the water was sewage-contaminated and the ducts were not replaced or professionally sanitized, you need to address that immediately with a restoration professional. Filter changes every 60 days for the first year are recommended regardless.
It depends on your policy and the nature of the failure. Insurance typically covers the original water event, not subsequent failures caused by improper restoration work. However, if the original claim included restoration and the work fails due to workmanship issues, your restoration contractor’s warranty should address it. If a new water event occurs, that’s a new claim. Document everything; your adjuster will ask for records.
A faint paint or construction smell is normal and should dissipate within weeks. A musty, earthy, or damp smell is not normal and indicates microbial activity or ongoing moisture. If the smell is coming from vents, check the filter and drain line first. If it persists, call for a professional inspection before the problem spreads through the system.
The Bottom Line
Water damage restoration in Corona is an investment in your home’s structural integrity, and like any investment, it requires ongoing attention to protect its value. The 30-60-90 day moisture verification schedule is the single most important maintenance step you can take after restoration work wraps up. Run the readings, log the numbers, inspect each room systematically, and keep your documentation organized. If something looks or feels wrong, it probably is. Catch it early, document it thoroughly, and call a professional when the numbers tell you to.
For IICRC-certified restoration work, Mold Remediation in Fallbrook and Fire Damage Restoration in Fallbrook are part of the broader services we provide across the Inland Empire. If you’re in Corona and need a post-restoration inspection, a second opinion on existing work, or a complete restoration for a new water event, call (833) 589-7005 for a free estimate.
Written by the team at OC Restoration Co, serving Corona since 2017.
See the difference
 Before
 After
 Before
 After
 Before
 After